2023-12-08 off1 upgrade#
This is the same operation as # 2023-02-17 Off2 Upgrade but for off1.
We will:
- add four 14T disks
- add an adapter card for SSD
- add two 2T nvme disk and one 14G optane, while keeping existing nvme
- completely reinstall the system with Proxmox 7.4.1
- rpool in mirror-0 for the system
- using a 70Gb part on all hdd disks
- zfs-hdd in raidz1-0 for the data
- using a 14T-70G par on all hdd disks
- zfs-nvme in raidz1-0 for data that needs to be fast
- using the two 2T nvme
- using 8G part on octane for logs
- rpool in mirror-0 for the system
2023-12-18 server physical upgrade at free datacenter#
We arrived in the morning, and go to server room, thanks to our hosts.
Physical changes#
We disconnected off1 cables, after taking a photo, to be sure to put ethernet cables to the right position when pluging them back.
As off2 was above off1, we inverted their positions by moving off1 on top.
We unplug the server.
We removed off1 cover by pulling on the handle above the case.
We put memories arranging them symmetrically to the existing one.
We put HDDs in place on the front.
We dismount the card on the back to replace it for a 4 slot cards, with our new SSDs and optane.
We plug a monitor and a keyboard on off1 (on the rear).
For more details, see also Hardware in 2023-02-17 Off2 Upgrade
Configuring BIOS#
We then close the machine and reboot to get the bios.
Slot bifurcation#
This is for the SSD card.
We go in:
- System BIOS
- Integrated devices
- Slot bifurcation
- we choose: Auto discovery of bifurcation
IDRAC / IPMI#
We go in Network settings to configure IDRAC / IPMI (which has its own ethernet card):
- disable DHCP and auto-discovery
- Static IP address: 213.36.253.207
- Gateway: 213.36.253.222
- Subnet Mask: 255.255.255.224
- Static Prefered DNS: 213.36.253.10
- Static Alter: 213.36.252.131
PERC adapter#
We go reboot and go again in the BIOS to configure PERC Adapter Bios (Power Edge RAID Controller), and change configuration to be in HBA mode for disks.
We had some problem setting up the disks, because they were part of a RAID.
First boot we saw only 3 disks, but after a reboot we saw 4.
In main menu, physical disk management, we use "Convert to non RAID Disks" for both disks.

As we start we still have an error:

Indeed at boot we see there is One virtual drive and two non raid disk (we should have 4).

We had to delete this virtual disk in the BIOS, in virtual disks management.

We then put the disks in HBA mode (in control management)
Firmware updates first try#
At this point we were stuck with the same error as before. It suggested to update the PCIe firmware, so we decided to try this.
F10 (lifecycle controller) brings us to a screen for that.
After a long consultation of HP website, we get to the lifecycle wizard.
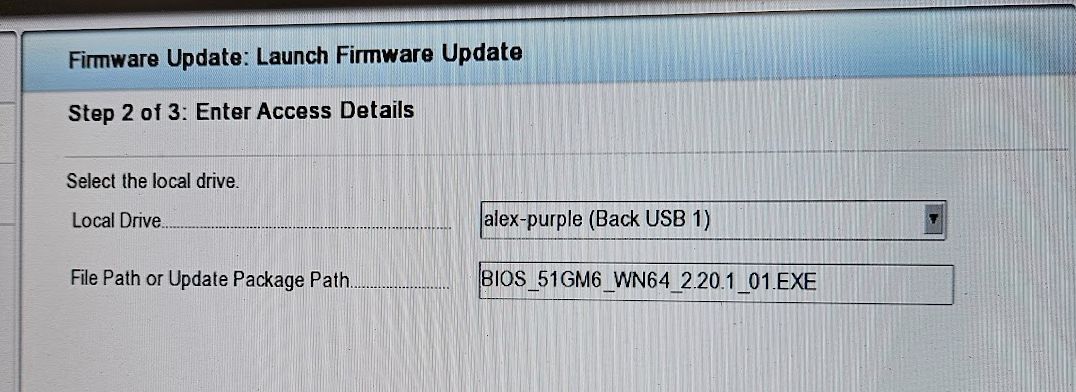
We get to Firmware updates, lifecycle manager, launch firmware update.
- At step 3 out of 5 we had to configure the Network. We did the error to not use the right address several time, at the end, the idea is to use the public IP of the server (and neither the private, nor the IPMI one)
- we choose FTP Server but it was not the good one, neither was HTTPS server responding
We also tried to use a program through USB stick, but it did not work.
We saw that disabling SSD card we were able to boot.
We decided to disable the SSD card and continue installation.
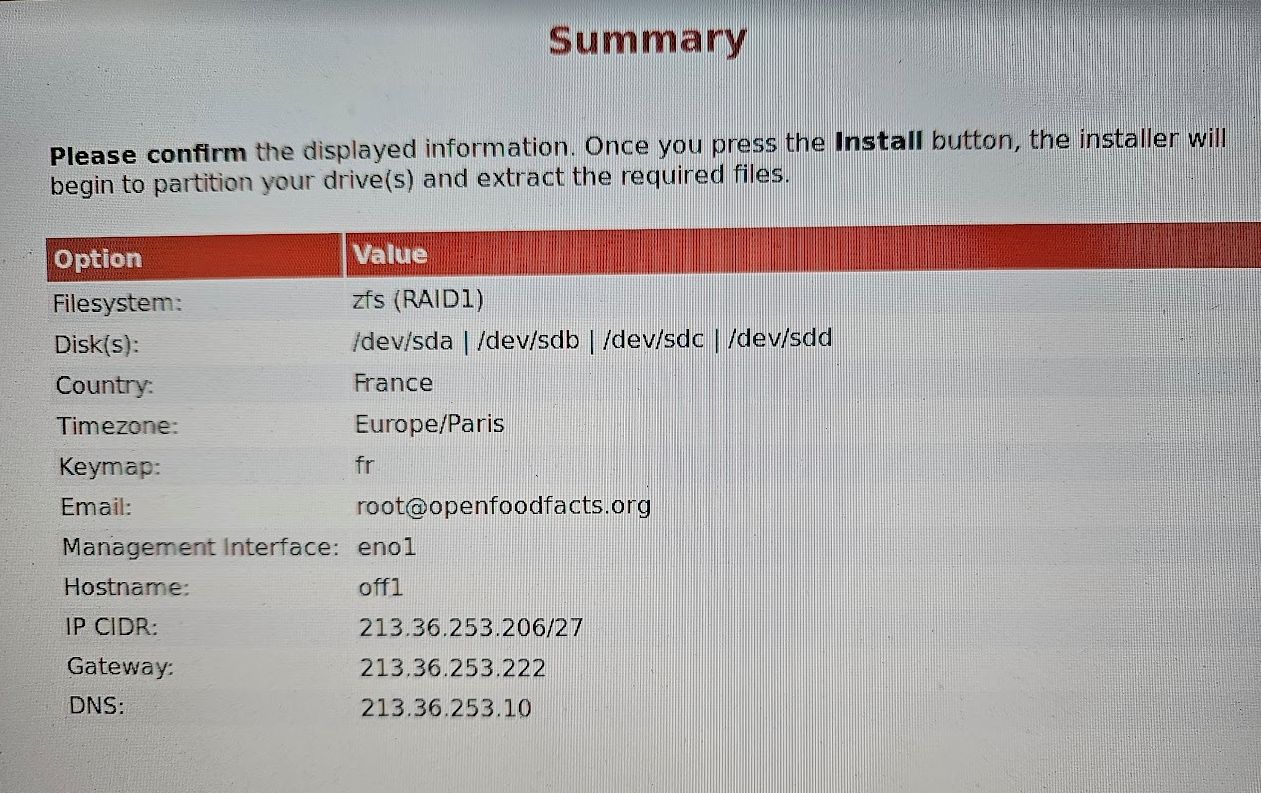
Installing Proxmox#
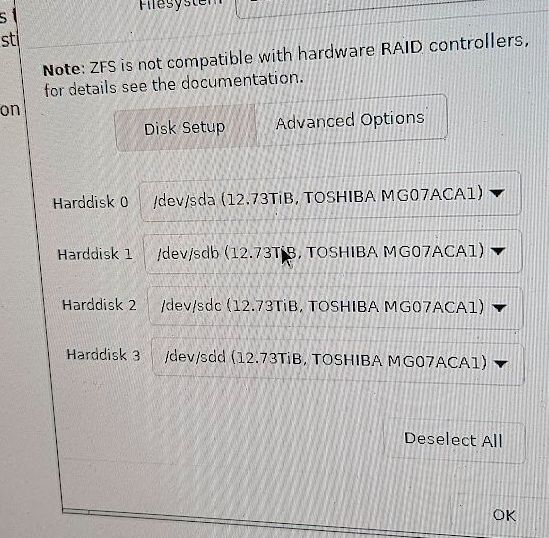
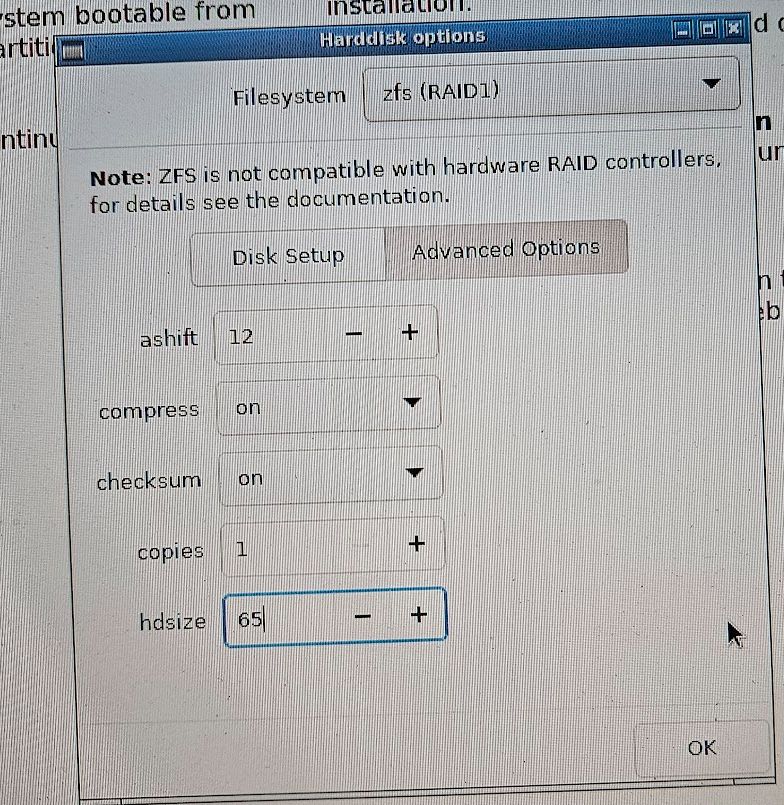
We boot on the USB key that we had brought with proxmox install CD on it.
For Hard disk options, we choose ZFS - RAID1, ashift 12, compress an checksum on, disk size 64G
We choose a good password for root.
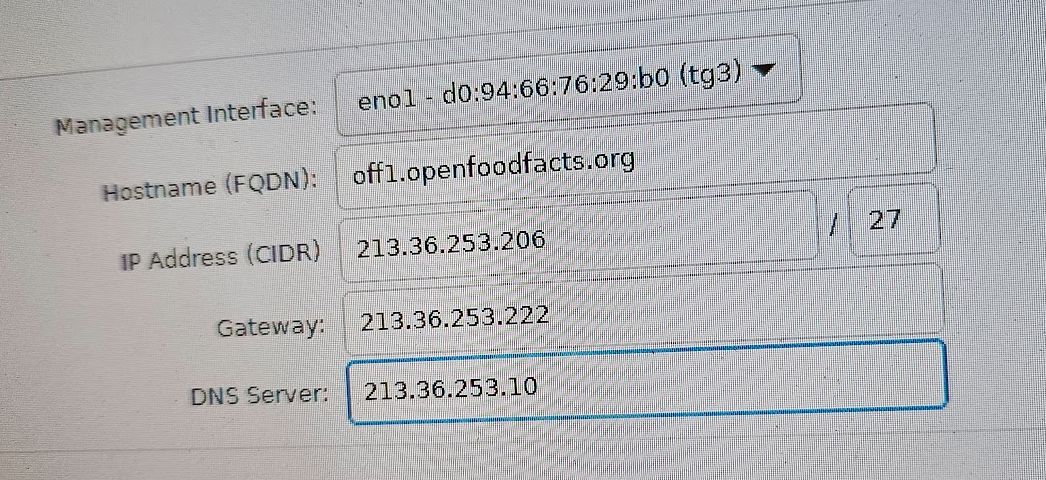
We configure eno1 network
Firmware updates again#
After install and adding openssh-server, we were being able to log as root.
We found a USB boot disk for HP servers. We mounted it on the server.
We tried to use suu --import-public-keys it does something.
We where able to upgrade the lifecycle controller, but not the bios.
After a lot of trying, where addresses provided on HP website to upgrade were not working, Stéphane finally found a forum post that gave us the right URL to put in lifecycle manager to get updates.
We used 143.166.28.19 in place of downloads.dell.com and it worked !

We finally get BIOS 2.19.1.
SSDs again#
Even after upgrading BIOS, SSD is not working. By removing SSDs one by one, we found the culprit. So we mount back all SSDs but one.
When we restarted the server, we got an error, because there is a conflict with existing old rpool (which was on SSD).
We resolved this by force importing the right pool using it's ID (that we get with zpool status) and destroying the other. (or something like that !)...
2023-12-21 continuing server install#
First ssh connexion#
Using root: ssh root@off1 -o PubkeyAuthentication=no
Update and add some base packages#
Change /etc/apt/sources.list.d/pve-enterprise.list for /etc/apt/sources.list.d/pve-install-repo.list,
with inside:
apt update
apt upgrade
apt install munin-node sudo vim parted tree etckeeper rsync screen fail2ban git curl htop lsb-release bsd-mailx
Configure locale#
vim /etc/locale.gen
# uncomment fr_FR.UTF-8, and exit
locale-gen
Network configuration#
In /etc/network/interfaces added the vmbr1 bridge interface (on eno2):
auto vmbr1
iface vmbr1 inet static
        address 10.0.0.1/8
        bridge-ports eno2
        bridge-stp off
        bridge-fd 0
        post-up echo 1 > /proc/sys/net/ipv4/ip_forward
        post-up   iptables -t nat -A POSTROUTING -s '10.1.0.0/16' -o vmbr0 -j MASQUERADE
        post-down iptables -t nat -D POSTROUTING -s '10.1.0.0/16' -o vmbr0 -j MASQUERADE
Then systemctl restart networking
And verify with ip address list and ip route list
default via 213.36.253.222 dev vmbr0 proto kernel onlink
10.0.0.0/8 dev vmbr1 proto kernel scope link src 10.0.0.1
213.36.253.192/27 dev vmbr0 proto kernel scope link src 213.36.253.206
Creating users#
First created off user (to ensure it have 1000 id):
adduser --shell /usr/sbin/nologin off
Then add other sudo users, like:
adduser alex
...
adduser alex sudo
I also copied password hash for off2 to off1 (user can then decide to change their password altogether).
Creating ZFS pools#
We already have rpool where the distribution is installed.
Partition disks#
First we need to create partitions on our four HDD to be part of zfs-hdd.
They already have a partition for the system (participating in rpool)
Running:
for name in a b c d; do parted /dev/sd$name print; done
Model: ATA TOSHIBA MG07ACA1 (scsi)
Disk /dev/sdd: 14,0TB
Sector size (logical/physical): 512B/4096B
Partition Table: gpt
Disk Flags:
Number  Start   End     Size    File system  Name  Flags
 1      17,4kB  1049kB  1031kB                     bios_grub
 2      1049kB  1075MB  1074MB  fat32              boot, esp
 3      1075MB  69,8GB  68,7GB  zfs
We can print sectors to know where to start next partition more precisely:
for name in a b c d; do parted /dev/sd$name 'unit s print'; done

...
Number  Start     End         Size        File system  Name  Flags
...
 3      2099200s  136314880s  134215681s  zfs
We add 2048 to 136314880 to be better aligned.
So now we create the partitions on the remaining space:
for name in a b c d; do parted /dev/sd$name mkpart zfs-hdd zfs 136316928s 100%; done
We also want to partition the SSDs and octane.
Listing them to know which is which:
for device in /dev/nvme?;do echo $device "--------";smartctl -a $device|grep -P '(Model|Size/Capacity)';done

/dev/nvme0 --------
Model Number:                       WD_BLACK SN770 2TB
Namespace 1 Size/Capacity:          2 000 398 934 016 [2,00 TB]
/dev/nvme1 --------
Model Number:                       INTEL MEMPEK1J016GA
Namespace 1 Size/Capacity:          14 403 239 936 [14,4 GB]
/dev/nvme2 --------
Model Number:                       Samsung SSD 970 EVO Plus 1TB
Namespace 1 Size/Capacity:          1 000 204 886 016 [1,00 TB]
So:
- /dev/nvme0 is the 2TB SSD
- /dev/nvme1 is the octane (14,4 GB)
- /dev/nvme2 is the (old) 1TB SSD
I follow the partitioning of off2:
# 2TB SSD is devoted entirely to zfs-nvme
parted /dev/nvme0n1 mklabel gpt
parted /dev/nvme0n1 mkpart zfs-nvme zfs 2048s 100%

# Octane is divided as log for zfs-hdd and zfs-nvme
parted /dev/nvme1n1 mklabel gpt
parted /dev/nvme1n1 \
  mkpart log-zfs-nvme zfs 2048s 50% \
  mkpart log-zfs-hdd zfs 50% 100%

# 1TB SSD will be cache for zfs-hdd
parted /dev/nvme2n1 mklabel gpt
# we need to have a xfs partition, I don't know exactly why !
# but without it, the zfs partition is changed to a xfs one…
parted /dev/nvme2n1 \
  mkpart xfs 2048s 64G \
  mkpart zfs-hdd-cache zfs 64G 100%
We can see all our partition on the disk:
ls /dev/sd?? /dev/nvme?n1p?

lsblk
Creating zfs pools#
We creates a zfs-hdd pool with partitions mounted as zraid1 and (sda4, sdb4, sdc4 and sdd4) and a partition on the octane disk as log and some properties.
zpool create zfs-hdd -o ashift=12 raidz1 sda4 sdb4 sdc4 sdd4
zfs set compress=on xattr=sa atime=off zfs-hdd
zpool add zfs-hdd log nvme1n1p2
zpool add zfs-hdd cache nvme2n1p2
Note:
Doing the later I got: /dev/nvme1n1p2 is part of potentially active pool 'zfs-hdd'
This is because octane was used in a previous install on off2.
I just did: zpool labelclear -f nvme1n1, zpool labelclear -f nvme1n1p2 and zpool labelclear -f nvme2n1p2
(for real, tried to clear the label on any not yet used partition).
We creates a zfs-nvme pool but with only nvme0n1p1, as it's the only SSD and a partition on the octane disk as log and some properties. It can't be a mirror yet because there is only one device… we will have to backup, destroy and re-create it with new nvme to be able to have a mirror.
zpool create zfs-nvme -o ashift=12 nvme0n1p1
zfs set compress=on xattr=sa atime=off zfs-nvme
zpool add zfs-nvme log nvme1n1p1
Joining PVE cluster#
It's time to join the cluster. We will join it using internal ip !
preparing /etc/hosts#
I edited /etc/hosts on off1 to have:
127.0.0.1 localhost.localdomain localhost
# 213.36.253.206 off1.openfoodfacts.org off1
10.0.0.1 off1.openfoodfacts.org off1 pve-localhost
10.0.0.2 off2.openfoodfacts.org off2
...
And on off2:
127.0.0.1 localhost.localdomain localhost
10.0.0.2 off2.openfoodfacts.org off2 pve-localhost
#213.36.253.208 off2.openfoodfacts.org off2
10.0.0.1 off1.openfoodfacts.org off1
...
creating the cluster on off2#
See official docs
On off2:
pvecm create off-free
pvecm status
joining the cluster from off1#
On off1
pvecm add 10.0.0.2 --fingerprint "43:B6:2A:DC:BF:17:C8:70:8F:3C:A4:A8:2D:D5:F8:24:18:6B:78:6D:24:8A:65:DA:71:04:A3:FE:E0:45:DE:B6"
Note: first time I did it without --fingerprint option.
I verified the fingerprint by looking at the certificate of proxmox manager in firefox.
Using systemd-timesyncd#
As it's proposed by Proxmox guide
I installed systemd-timesyncd on off1 and off2.
adding the storages#
We create pve pools:
zfs create zfs-hdd/pve
zfs create zfs-nvme/pve
pvesm status
Name            Type     Status           Total            Used       Available        %
backups          dir     active     39396965504             256     39396965248    0.00%
local            dir     active        64475008        11079168        53395840   17.18%
zfs-hdd      zfspool     active     39396965446             139     39396965307    0.00%
zfs-nvme     zfspool     active      1885863288              96      1885863192    0.00%
Also the backups dir automatically get on zfs-hdd, but I don't really know why !
cat /etc/pve/storage.cfg helps see that.
I still have to create it:
zfs create zfs-hdd/backups
Adding ro_users group to proxmox#
We have a ro_users group for users to have read-only access to the proxmox interface.
I created the group, going to cluster interface in proxmox and using create.
I then go to permissions and give the PVEAuditor role to the group on / with propagate.

Getting containers templates#
See proxmox docs on container images
pveam update
pveam available|grep 'debian-.*-standard'
pveam download local debian-11-standard_11.7-1_amd64.tar.zst
pveam download local debian-12-standard_12.2-1_amd64.tar.zst
Adding openfoodfacts-infrastructure repository#
Added root ssh pub key (cat /root/.ssh/id_rsa.pub) as a deploy key to github infrastructure repository
cd /opt
git clone git@github.com:openfoodfacts/openfoodfacts-infrastructure.git
Adding Munin monitoring#
Simply following our Munin doc on how to configure a server
Configuring snapshots and syncoid#
I first installed sanoid following install instructions
We want to pull snapshots from off1 and to let ovh3 pull our snapshots.
Enabling sanoid#
for unit in email-failures@.service sanoid_check.service sanoid_check.timer sanoid.service.d; \
  do ln -s /opt/openfoodfacts-infrastructure/confs/off1/systemd/system/$unit /etc/systemd/system ; \
done
systemctl daemon-reload
systemctl enable --now  sanoid_check.timer
systemctl enable --now  sanoid.service
sync from off2 to off1#
creating off1operator on off2#
Similar as off2operator on off1
adduser off1operator
... add ssh pub key ...

zfs allow off1operator hold,send zfs-hdd
zfs allow off1operator hold,send zfs-nvme
zfs allow off2operator hold,send rpool
On off1, test ssh connection
ssh off1operator@10.0.0.2
Doing first sync#
Create conf for syncoid on off1
ln -s /opt/openfoodfacts-infrastructure/confs/off1/sanoid/syncoid-args.conf /etc/sanoid/
Do first sync by hand in a screen (because it will take a very long time):
set -x; \
grep -v "^#" /etc/sanoid/syncoid-args.conf | \
while read -a sync_args; \
do syncoid "${sync_args[@]}" </dev/null || echo FAILED; done
Enabling syncoid#
On off1 enable syncoid service:
ln -s /opt/openfoodfacts-infrastructure/confs/off1/systemd/system/syncoid.service /etc/systemd/system
systemctl daemon-reload
systemctl enable syncoid.service
sync from off1 to off2#
creating off2operator on off1#
(using env variable for easy copy/paste)
OP_USER=off2operator
adduser $OP_USER

mkdir /home/$OP_USER/.ssh
vim /home/$OP_USER/.ssh/authorized_keys
# copy off2 public key

chown $OP_USER:$OP_USER -R /home/$OP_USER
chmod go-rwx -R /home/$OP_USER/.ssh
Adding needed permissions to pull zfs syncs
zfs allow $OP_USER hold,send zfs-hdd
zfs allow $OP_USER hold,send zfs-nvme
zfs allow $OP_USER hold,send rpool
On off2, test ssh connection:
ssh off1operator@10.0.0.2
Doing first sync#
I did the sync manually issuing commands one by one.
Like: syncoid --no-sync-snap --no-privilege-elevation off2operator@10.0.0.1:zfs-nvme/pve/subvol-102-disk-0 zfs-hdd/backups/mongodb
and copying relevant part to syncoid.conf just after
Adding entries to sanoid.conf#
Entries were added to /etc/sanoid/syncoid.conf.
Also newly created backup datasets to /etc/sanoid/sanoid.conf
Commit changes in /opt/openfoodfacts-infrastructure.
Monitor next sanoid / syncoid run.
sync from ovh3 to off1#
- I created ovh3operator on off1 with ovh3 root public key
- I created ovh3operator on off2 with ovh3 root public key
- I created the syncoid.conf file
- I did off1 syncs by hand (copy/pasting from the syncoid.conf)
- I modified the sanoid.conf file to add the new datasets and the related policy for snapshot management
- then created
/etc/systemd/system/syncoid.serviceas a link definition to the service in this repository, same for/etc/sanoid/syncoid.conf, did asystemctl daemon-reloadand activated the service:systemctl enable syncoid.service